Documentation / Setup / Google
Connect Google to your NAS
This guide connects Google to PaNasMs (Pavlo's NAS Management System). You will create a Google client once, save its two credentials on your NAS, then link a Google account to your existing NAS user.
Result: use Sign in with Google with your existing NAS user. Optionally, authorize Google Drive for Cloud Sync in a separate step. Your normal NAS password still works. Creating a client or linking an account does not start synchronization.
Screenshots use the English interface and were captured on 22 September 2026. Example forms were not submitted. Google may move or rename controls.
How the proxy works
Your NAS can stay on your private network, behind NAT or CGNAT. No public NAS address, domain name or router port forwarding is required for Google authorization. The PaNasMs OAuth gateway provides the public HTTPS callback that Google needs.
- Start linking or sign-in in the NAS interface; it opens Google's authorization page.
- After you approve, Google sends a temporary authorization code to the gateway.
- The NAS retrieves the response through an outbound HTTPS request, then exchanges the code directly with Google. Keep the original NAS tab open during this step.
- The NAS finishes linking or sign-in. The authorization tab normally closes; if it stays open, return to the original NAS tab.
The gateway relays an authorization code and an opaque request identifier. It does not receive your client secret or the resulting access/refresh tokens. It is an external service involved in authorization, not a tunnel into your NAS and not a proxy for your Drive files. It does not make the NAS reachable when you are away from home; remote access to the panel is a separate setup.
Both the browser and NAS need internet access to Google and the gateway. If the gateway is unavailable, new Google authorization cannot finish; local NAS password login remains available. You do not need to deploy your own proxy for this setup.
Before you start
- Have your Google account and your current NAS password ready.
- Sign in to PaNasMs as an administrator to configure the client.
- Your NAS and browser need internet access. You do not need to expose your NAS to the internet or forward a router port: the built-in HTTPS callback handles Google's response.
- Keep the NAS tab open while working in Google Cloud Console in another tab.
Already have a Web application client for this NAS? Check its redirect URI in step 4, then go to step 5. Do not create a replacement client just to link another Google account.
1. Create or select a Google project
- Open Google Cloud Console.
- Sign in with the Google account that will manage the NAS integration.
- Click the project selector next to the Google Cloud logo, then New project.
- Enter a name such as PaNasMs home NAS. The automatically suggested Project ID can stay as it is; yours may differ from the screenshot.
- For a personal account, leave Parent resource as No organisation. A work account may require an organisation selected by your administrator.
- Click Create, wait for creation, and select the new project in the header.
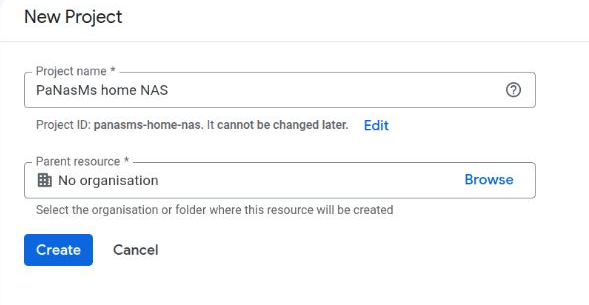
You can also use an existing project that you manage. No virtual machine, storage bucket or Drive API is needed for this sign-in setup.
2. Tell Google what your app is
Open Google Auth Platform and check that the correct project is selected at the top.
If you see Get started, click it and complete the short wizard:
| Screen | What to enter |
|---|---|
| App information | App name: PaNasMs home NAS. User support email: your email. |
| Audience | Choose External for personal Google accounts, or a mixture of personal and work accounts. |
| Contact information | An email address you check. |
| Finish | Read Google's policy; if you agree, accept it, then Continue → Create. |
If the app is already configured, the same settings are under Branding and Audience in the left menu. A logo and public website are not needed for this personal testing setup. Do not invent website or domain ownership details.
See Google's consent setup instructions if your console shows a different setup wizard.
3. Check the audience
In the left menu, open Audience. For this guide, leave:
- User type: External.
- Publishing status: Testing.
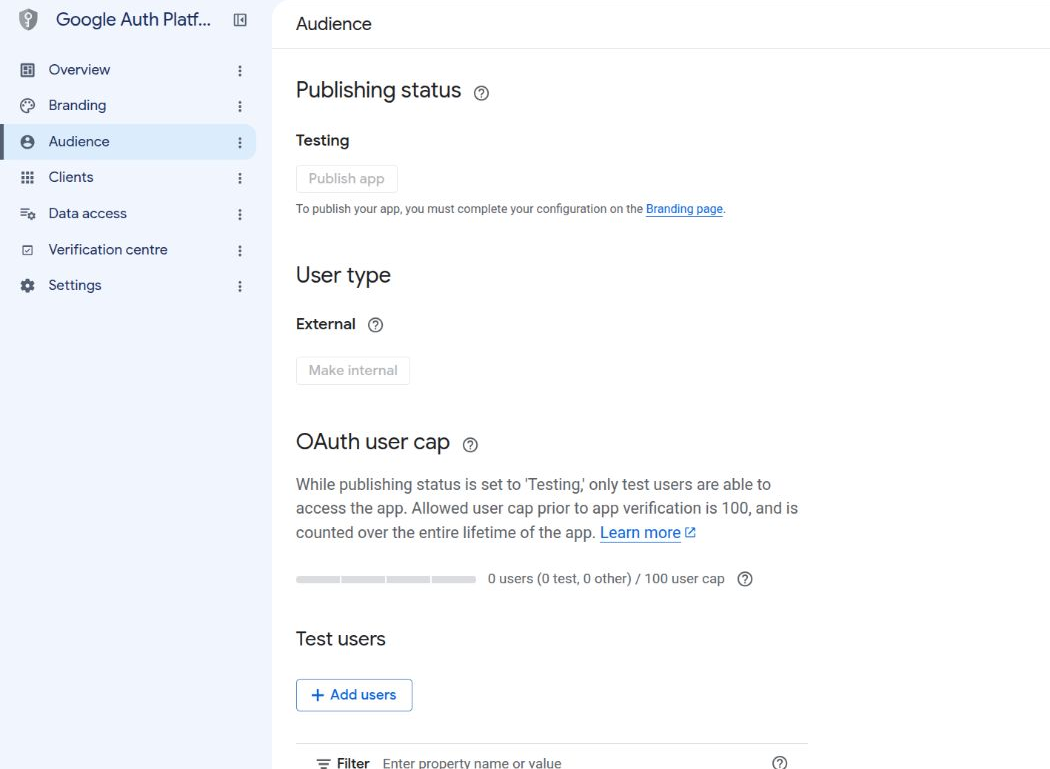
You do not need to press Publish app for identity-only sign-in. The empty test-user list in this screenshot is intentional: PaNasMs sign-in asks only for your identity, email and profile. Google exempts these permissions from the testing user-list requirement and seven-day authorization expiry. For additional permissions such as Drive in step 8, the testing rules differ: Audience → Add users is where you add the intended Google email addresses. See Google's audience rules.
PaNasMs requests openid, email and profile itself. You do not need to add
Drive, Gmail or Calendar permissions for panel sign-in. If you maintain a scope
list under Data access, keep it limited to those basic identity permissions.
4. Create the Google client
Open Clients → Create client in Google Auth Platform.
| Field | Value |
|---|---|
| Application type | Web application — not Desktop app |
| Name | PaNasMs home NAS or another name you recognise |
| Authorised JavaScript origins | Leave empty for the PaNasMs server-side flow |
| Authorised redirect URIs | Click Add URI in this section and paste the exact callback below |
https://panasms-oauth-gateway.panasms.workers.dev/callback
You can also copy this address from PaNasMs → Settings → External connections → Authorized redirect URI. Use the value shown by your NAS if it differs. Do not put your local NAS address here, and do not add a trailing slash.
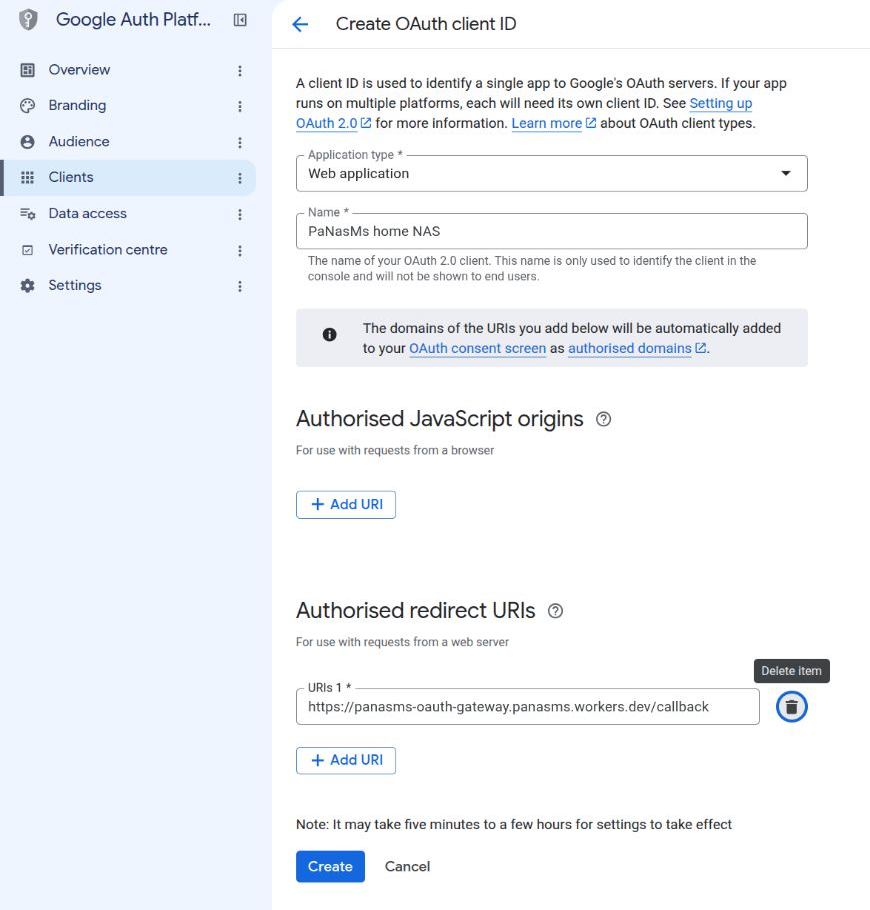
Click Create. Google shows a Client ID and Client secret. Copy both to a password manager or keep that dialog open for the next step. The secret is shown when created; do not assume you can view it again later. If Google offers a credentials JSON download, store it privately. Never commit it to GitHub or include the secret in a screenshot. These are application credentials, not your Google password. See Google's client creation documentation.
5. Save the credentials on your NAS
In the NAS tab, open Settings → External connections.
- Paste Google's Client ID into Client ID.
- Paste Google's Client secret into Client secret.
- Select Enable Google account linking and sign-in.
- Click the checkmark button at the bottom. Its tooltip says Apply.
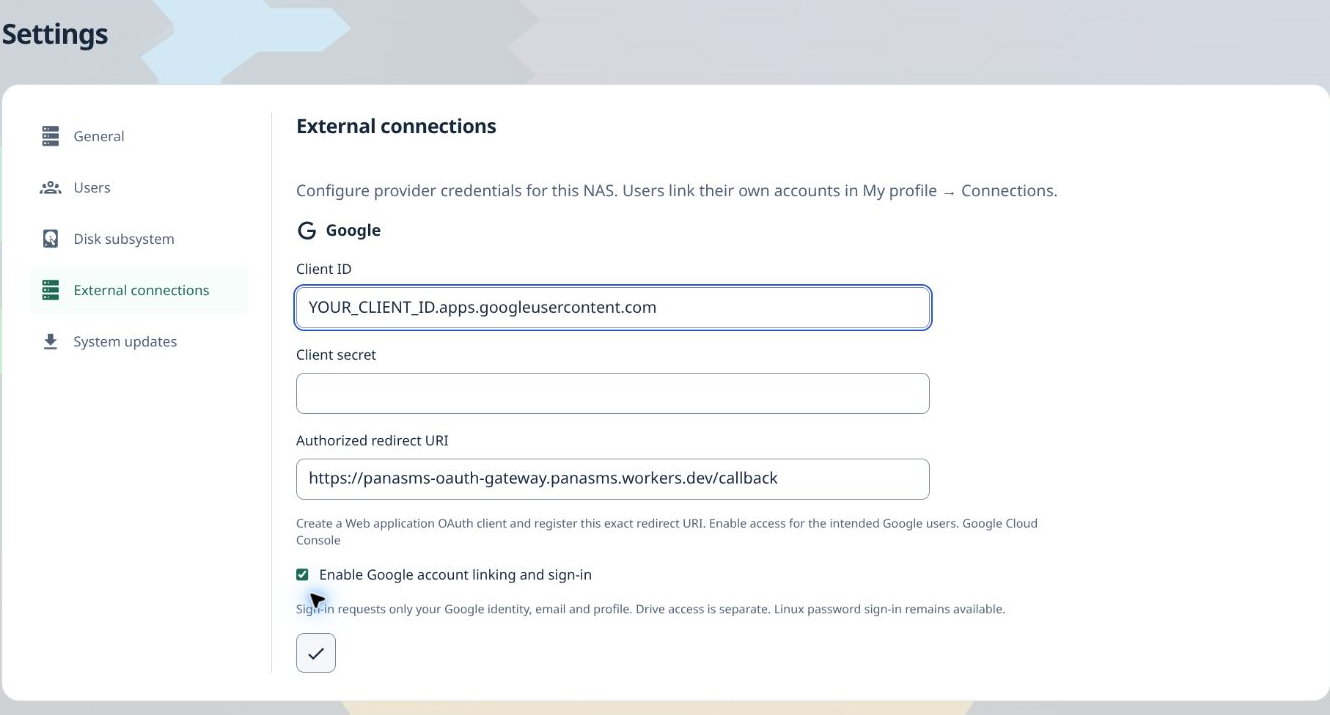
The screenshot uses a placeholder ID and an empty secret field for illustration. Enter your real values. After saving, dots in the secret field mean a secret is already stored. Leaving that field untouched keeps it when the Client ID has not changed. A new Client ID requires its matching secret.
6. Link your Google account
Saving the client enables the feature; it does not yet link a user.
- Open the user menu in the top-right corner, then My profile → Connections.
- Click the Link Google account icon. Hover over an icon to see its title.
- Enter your current NAS/Linux password, then click Continue.
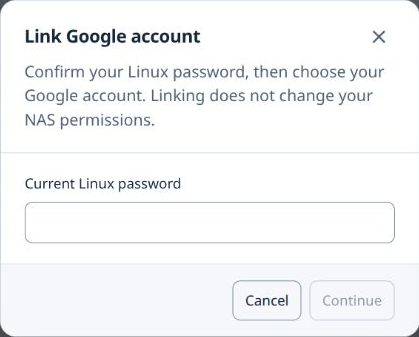
- In the Google tab, choose the account you want to link. Review and approve the requested identity access. Enter a Google password only on Google's page.
- Keep the original NAS tab open. The authorization tab normally closes automatically after handing the response back. If it stays open with Authorization received, return to the NAS tab yourself.
- Wait until your Google account appears under Linked accounts. That is the confirmation that linking finished; the callback page alone is not.
If your browser blocks the new tab, use the authorization link in the NAS dialog. Repeat these steps to link another personal or work Google account to the same NAS user. You do not need a second Google client. A Google account can belong to only one NAS user on the same NAS.
7. Try signing in
Keep your current NAS session open and open the NAS in a private/incognito browser window. On the login screen, choose Sign in with Google and select one of the accounts you linked. You should arrive at your usual NAS desktop.
Your existing Linux permissions still apply. Google linking does not create an administrator, create a Linux user or change Linux/SMB passwords. If Google or the internet is unavailable, use the normal NAS username and password.
8. Optional: connect Google Drive to Cloud Sync
Skip this section if you only want Google sign-in. Use the same Google project and Web application client already configured on the NAS.
- In Google Cloud Console, open APIs & Services → Library, find Google Drive API, and click Enable for this project.
- Under Google Auth Platform → Audience, add every intended Google account to Test users while the app is in Testing. This matters for Drive even when basic sign-in worked without a test-user entry.
- If configuring Data access, add the Drive scope requested by your module.
Current Cloud Sync requests
https://www.googleapis.com/auth/driveto work with existing folders and upload, edit or delete files. The core also supportshttps://www.googleapis.com/auth/drive.readonlyfor read-only consumers. - In PaNasMs, install and enable Cloud Sync, then start its new-sync wizard. Choose a linked Google account and Allow Google Drive access. Confirm your NAS password and approve the additional permission in Google, using the same Google account you selected in the wizard.
- Choose the Google Drive folder, destination folder on the NAS and sync direction. Review the summary before starting. Linking alone never chooses or syncs folders.
Choosing a folder limits the sync job, not the Google permission: full Drive consent can cover more than that folder. Each Google account needs its own consent; repeat the wizard for other accounts. Review or revoke module permissions in My profile → Connections.
Testing, Production and verification
For an External app in Testing, Drive offline authorization normally expires after seven days; reconnecting is then needed. Basic identity-only sign-in has an exception. For ongoing synchronization, review Audience → Publish app to move your own project to Production. Follow Google's current requirements for your app.
Production is not verification. Drive scopes used here are restricted. Google may still show an unverified-app warning, apply a user cap, or require verification and, depending on use, a security assessment. Personal-use exceptions do not mean that your app is verified. Work accounts may also require administrator approval. Do not promise unattended access based solely on the publishing-status switch.
If Google requests branding, website, privacy policy or domain ownership, provide
accurate details for your own application. Our project pages do not give you
ownership of panasms.github.io or the gateway domain. If verification requires
control of a callback domain you do not own, the shared gateway alone cannot meet
that requirement; this needs a supported deployment with a domain you control.
Do not change the callback in Google alone: it must match the NAS implementation.
See Google's audience and publishing rules, Drive scope classifications and OAuth verification guidance.
If something does not work
| What you see | What to do |
|---|---|
redirect_uri_mismatch |
Open the same Google client used by the NAS. Compare Authorised redirect URIs with the NAS field, including https, /callback and the absence of an extra slash. |
invalid_client or a client-credential error |
Recheck that Client ID and secret came from the same Web application client. Enter its correct secret on the NAS and apply. If lost, create a replacement secret in Google and update the NAS; do not revoke a working one before the replacement works. |
| A change in Google has not taken effect | Google Console warns that changes can take five minutes to a few hours. Wait, then start a fresh linking attempt from the NAS. |
Access blocked or org_internal |
Check Audience and the selected Google account. Personal accounts need an External app. A managed work account may need permission from its Workspace administrator. |
| Google asks for file access | Expected only when you explicitly authorize Drive in a module. Basic panel sign-in needs no file or Gmail access. Check the app and requested permissions. |
| Drive access blocked, or it stops after seven days | Check Drive API, test-user membership and Testing status. See step 8; publishing does not remove verification or Workspace policy requirements. |
| Gateway unavailable or authorization times out | Check internet access from both NAS and browser. Keep the original NAS tab open. Restart the attempt once connectivity is restored; do not expose the NAS or change the callback to a local IP. |
| Google account is not linked | Sign in using your NAS password and complete My profile → Connections first. Matching email addresses alone do not link accounts. |
| Authorization received, but no account appears | Return to the original NAS tab and check its result. If the attempt expired, close the dialog and start again there. Do not refresh/reuse Google's completed callback. |
| No Google sign-in button | Check that an administrator saved valid client settings and enabled linking/sign-in, then refresh the login page. |
For implementation details, see External connections and Module permissions.
Screenshot credits
Google Cloud screenshots show Google's interface; its branding remains Google's. PaNasMs screenshots were captured from the running application, with example fields and crops excluding private account details. The NAS settings image includes Flow by Sandra Smukaste, from the KDE wallpaper collection, licensed under CC BY-SA 4.0. The PaNasMs screenshot assets are shared under CC BY-SA 4.0, retaining the interface and wallpaper credits. This does not relicense Google's artwork.
Also available: Set up GitHub sign-in for your NAS.
Also available: Set up Dropbox account linking.